# Input Options
Video on YouTube: Overview input options (opens new window) (German, but auto-translated subtitles available)
This chapter is about how grid elements can be selected with different input modalities.
Clicking on Button “Input Options” in Main view opens a menu with the following entries:
- Mouse/Touch input: options for input types like normal mouse click, tap or hovering
- Scanning: Input method for 1-2 input events, subsequently select groups of elements until one element is chosen
- Direction input: Input method for 2-5 input events, 1-4 input events for navigating in different directions, 1 input event for selecting an element
- Huffman input: 2-9 input events, assigns a code to each grid element which consists of an ordered sequence of the available input events
- Sequential input: 2 input events, one for navigating to the next element one for selecting the current element
# Introduction to input events
Video on YouTube: Input actions and input events (opens new window) (German, but auto-translated subtitles available)
An input event in general is any kind of defined, single user interaction. AsTeRICS Grid currently supports the following input event types:
- Keypress: event of pressing a key on the keyboard, also can be an external button press using additional external hardware
- AsTeRICS ARE event: any event that is generated by a running model within the AsTeRICS Framework. This type of event is very flexible and can be e.g. eye movement, head movement or a signal of an EMG muscle activity sensor.
These types of input events can be used in all input methods except Mouse/Touch input where the input events are mouse movements and click/tap events.
# Keypress input events
Figure 1 shows the configuration possibilities of a keypress event (f.e. choose Scanning as Input option and enable Scanning):
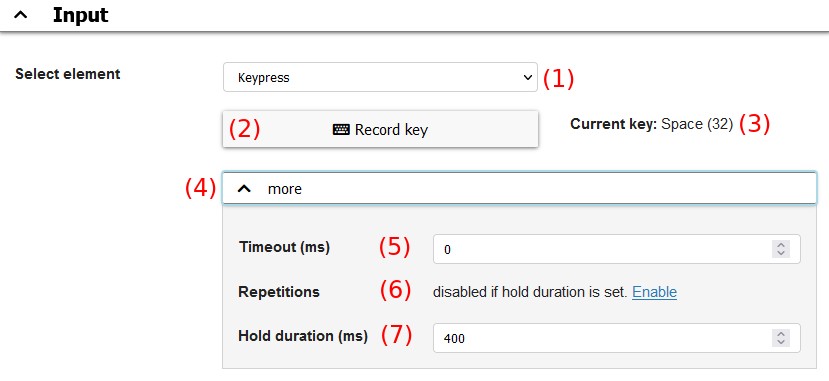
Fig. 1: Configuration of a keypress input event
These are the shown elements and options:
- Dropdown: allows to choose between Keypress or AsTeRICS ARE event (or not defined)
- Record key: click in order to start keyboard record mode. A subsequent keypress on the keyboard will be recorded and that key used for the event.
- Current key: prints the currently recorded/used key. Digit1 means the
1digit key on the keyboard. - More: an accordion of additional options that can be opened/closed by a click
- Timeout: minimum pause in milliseconds between two subsequent actions (if faster, the second action is ignored). Mandatory if different Repetitions are set for the same key in order to wait for possible upcoming repetitions before performing the action.
- Repetitions: the number of times the key has to be pressed in order to perform the action
- Hold duration: time in milliseconds how long a key has to be pressed in order to perform the action
Note that it’s not possible to set both Repetitions greater 1 and Hold duration greater 0 at the same time.
# Usage examples
Here are some examples for the properties Timeout, Repetitions and Hold duration that could be useful in real use cases:
- Different actions with same key (e.g. Space), distinction by hold duration:
- Action 1: Timeout=0, Repetitions=1, Hold Duration=0
- Action 2: Timeout=0, Repetitions=1, Hold Duration=400
- Pressing the key once performs action 1, Pressing and holding the key for 400ms performs action 2
- This is the default configuration for input method Scanning where this configuration can be tested
- Different actions with same key (e.g. Space), distinction by repetition:
- Action 1: Timeout=0, Repetitions=1, Hold Duration=0
- Action 2: Timeout=300, Repetitions=2, Hold Duration=0
- Pressing the key once and waiting 300ms performs action 1, pressing the key twice (with less than 300ms pause) performs action 2
- Filter unintended keypresses
- all actions: Timeout=0, Repetitions=1, Hold Duration=300
- any unintended keypresses are ignored and actions are only performed if a key is pressed longer than 300ms
# AsTeRICS ARE input events
Video on YouTube: AsTeRICS input events (opens new window) (German, but auto-translated subtitles available)
AsTeRICS ARE input events are triggered by external events of a running model within the AsTeRICS Framework.
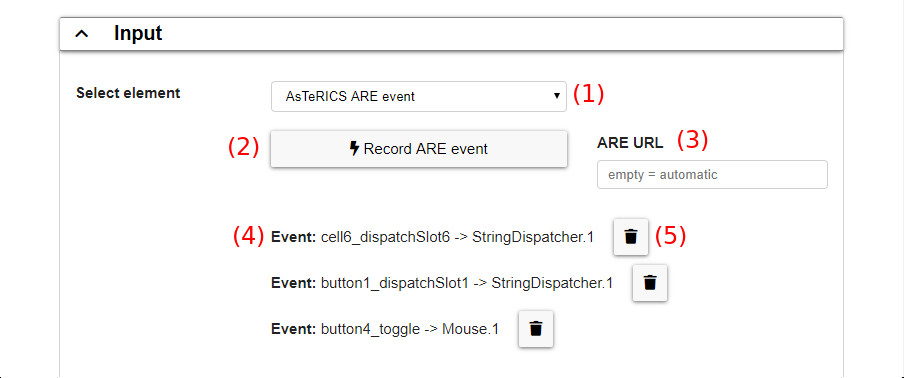
Fig. 2: Configuration of an AsTeRICS ARE input event
Figure 2 shows the configuration of an AsTeRICS ARE input event (AsTeRICS ARE Event is selected as select element in Figure 1, (1)):
- Dropdown: allows to choose between Keypress or AsTeRICS ARE event (or not defined). Here, the AsTeRICS ARE event is selected.
- Record ARE event: start recording of AsTeRICS ARE events. Subsequently trigger the desired event in ARE in order to be recorded.
- ARE URL: the URL of the running AsTeRICS instance. If AsTeRICS ARE is running on the same computer this field can be empty.
- List of events: list of recorded ARE events. Any of these events triggers the currently configured action.
- Recycle bin symbols: a click on the recycle bin symbol next to a recorded event deletes it
# Example of using an AsTeRICS ARE event
Follow these steps in order to set up an AsTeRICS Grid input method while using AsTeRICS ARE event for input:
- Open the settings modal for the desired input method in AsTeRICS Grid
- Start AsTeRICS ARE
- Select AsTeRICS ARE event for the desired input action in AsTeRICS Grid
- Click on “Record ARE event” to start recording
- Do any action in AsTeRICS ARE that tiggers an event, e.g. clicking on a button
- The recorded event should be shown in AsTeRICS Grid
- Save and close the input options in AsTeRICS Grid by clicking “OK”
- Redo the same action in AsTeRICS ARE as before - it should trigger the configured input action in AsTeRICS Grid
# Input options modals
Each input option dialog opened by “Main view - Input options” has about the same structure, see Figure 3 (can be seen as shown below when input option (here: Scanning) is enabled):
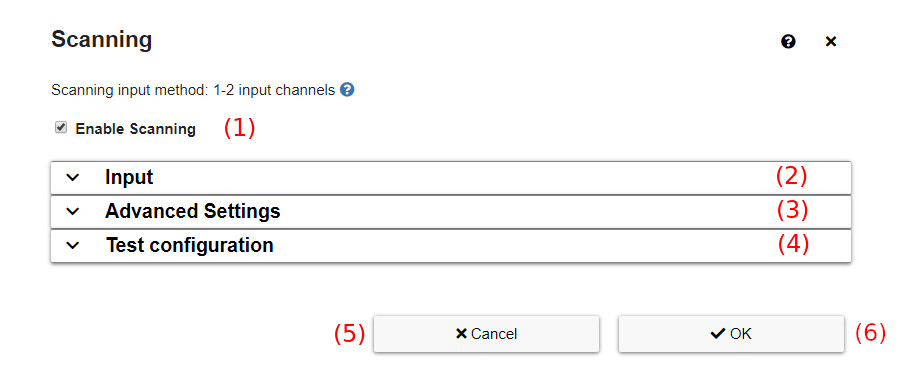
Fig. 3: General structure of an input option dialog, when input option is enabled
These are the basic elements of an input option dialog as in figure 3:
- Enable checkbox: Generally enable or disable this input method. The subsequent sections are only visible if the input method is enabled.
- Input section: configure input actions like described in section Introduction to input events
- Advanced settings: configure advanced settings for this input method
- Test configuration: opens a 10x10 test grid where the current input configuration can be tested
- Cancel: close the dialog discarding changes
- OK: close the dialog saving and applying changes
# Mouse/Touch input
Video on YouTube: Mouse and touch input (opens new window) (German, but auto-translated subtitles available)
Mouse/Touch input has the following options:
- Select with mouse click (or tap): if checked, elements can be selected by a simple mouse click or tap on a touchscreen
- Select with double click (or tap): if checked, elements can be selected by a double mouse click or tap on a touchscreen
- Enable hovering: enables hovering where elements are selected by moving the mouse on the element (=hovering) and waiting for some time. Hovering also works on touchscreens where the finger is held on an element for some time.
- Hover time: time in milliseconds to wait until a hovered element is selected. The value
0means that the hovered element is never selected. - Hide cursor: if checked the cursor is hidden and not visible while hovering above elements. This can be useful e.g. for eye-tracking where the cursor may be distracting.
- Read out active element: if checked the label of the hovered element is directly read out if the active element has changed
- Disable hover pane: Normally (without activating this option) it is possible to continue hovering after navigation to another grid without lifting the finger (on a touchscreen). Technically this function is implented by a global invisible hover pane., normally for hovering a global invisible hover pane is inserted. However this hover pane can cause problems in combination with a software controlled mouse cursor (emulated software mouse), because click actions may not reach the actual elements. In this case it might be useful / necessary to activate the function Disable hover pane.
- Hover time: time in milliseconds to wait until a hovered element is selected. The value
# Advanced setting “directly select element”
In Advanced Settings there is the additional option “Directly select element on pressing mouse button (not waiting for complete click)”. If it is enabled, the element is selected when pressing the mouse button, not when releasing the mouse button (which is default). For Touchscreens it’s similar: an element is selected directly at touching the screen, not after lifting the finger again (which is default). This can make sense for:
- facilitating operation for people which can’t reliably “tap” (quickly put finger on and lifting the finger afterwards) on the touchscreen.
- when using AsTeRICS Grid with an eyetracker and an additional button for clicking / selecting. Since the mouse controlled via an eyetracker always moves a little bit, in default mode it can happen that instead of selecting an element, the image of an element is dragged. This can be prevented if the selection of the element is done directly at pressing the mouse button.
# Scanning
Video on YouTube: Input method scanning (opens new window) (German, but auto-translated subtitles available)
The input method Scanning is suited to be used with 1-2 input events. It works as follows:
- Available elements are divided into groups
- One group is highlighted
- Group containing the desired element is selected
- Remaining elements are again divided into groups
- Steps 3 and 4 are repeated until the single desired element is selected
# Input events
These are the possible input events for Scanning:
- Select element: The select element selects the current group or element, it can be chosen by clicking on Record key and afterwards clicking on the desired key.
- Next scanning group: Here, the key for moveing the focus to the next group or element can be chosen. This input event is optional and can be omitted if timed scanning is activated (see Advanced settings). As above, the desired key shall be tapped after clicking on Record key.
# Advanced Settings
These are the advanced settings for Scanning:
- Vertical scanning: determines the orientation element groups are build:
- vertical (checked): groups are built vertical, moving left to right
- horizontal (unchecked): groups are built horizontal, moving top to bottom
- vertical (checked): groups are built vertical, moving left to right
- Binary scanning: defines if scanning groups are rows/columns or one half of existing elements:
- binary (checked): groups are built by separating remaining elements in two halves each scanning step

- non-binary (unchecked): groups are built row/column by row/column
- binary (checked): groups are built by separating remaining elements in two halves each scanning step
- Scanning selection by mouse click or tap: if checked the current scanning group can also be selected by a mouse click or tap anywhere on the screen
- Automatic (timed) scanning: if checked the active scanning group is automatically changed after a specific time, making it possible to use scanning just with a single input event
- Scanning time: time to wait before highlighting the next scanning group (in milliseconds)
- Time factor first element: the time to keep the first scanning group (e.g. first row/column) highlighted is “Scanning Time” multiplied with this factor. Increasing the time for the first group often improves usability.
# Direction Input
Video on YouTube: Input method direction input (opens new window) (German, but auto-translated subtitles available)
The input method Direction Input is suited to be used with 2-5 input events. It gives the possibility to simply navigate through elements in up to 4 directions.
# Input events
These are the possible input events for Direction Input:
- Select element: selects the currently highlighted element
- Go right: navigate to the right
- Go left: navigate to the left
- Go down: navigate down
- Go up: navigate up
The desired keys for each input event can be selected by clicking first on Record key and consecutively clicking on the desired key.
# Advanced Settings
These are the Advanced settings for Direction Input:
- Wrap around: if checked navigation continues at the opposite border, so e.g. moving left on the most left element sets the focus to the most right element
- Go to start position after select: if checked the focused element is set to the first element after an element was selected respective
# Huffman Input
Video on YouTube: Input method huffman input (opens new window) (German, but auto-translated subtitles available)
The input method huffman input is suited to be used with 2-9 input events. It assigns an unique code of input event sequences to each element. Triggering the respective input event sequence directly selects an element.
This is an example for 2 input events and 4 elements:
- Element A has code
11 - Element B has code
12 - Element C has code
21 - Element D has code
22
Triggering input event 1 and then input event 2 would directly select Element B.
Huffman input uses the theory of n-ary huffman codes (opens new window).
# Input events
These are the possible input events for Huffman Input:
- Input [1-9]: defines the input events of numbers
1-9that are used to enter the codes for selecting the elements. At least two input events have to be defined.
# Advanced Settings
These are the Advanced settings for Huffman Input:
- Show numbers: if checked the assigned codes are shown at the bottom of each element
- Show colors: if checked a color code is shown at the bottom of each element
- Color whole element: if checked the all grid elements are fully colored in the color of the next input event to trigger in order to select the element of interest
- Mark inactive elements: if checked all impossible elements are grayed out, so that e.g. starting input of the code with
1grays out all elements with codes that aren’t starting with1. - Timeout: time of inactivity (in milliseconds) for resetting the current, incomplete input. So if the first digit of the code
1was typed accidentally the user has to wait this time in order to be able to restart with another code. Simultaneously this is the time the user has to input the next digit of the code. If set to0the timeout is disabled. - Number of elements: by default (if this property is set to
0) the codes are automatically generated based on the number of elements in the current grid. This means that in one grid the n-th element could have a different code than in an other grid. To prevent this thenumber of elementsproperty can be set to the maximum number of elements that are existing in any grid. Therefore in every grid the n-th element will have the same code. - Color[1-n]: select the colors of the input events. If e.g. three inputs 1-4 are connected to a red, yellow, green and blue button, the colors can be adapted here in order to match the button colors. Default colors are taken from the “Wong” color pallete (opens new window).
# Sequential Input
Video on YouTube: Input method sequential input (opens new window) (German, but auto-translated subtitles available)
The sequential input method can be used with 2-3 input events. 2 input events are necessary, one (Previous element) is optional. The sequential input sequentially focuses all elements and afterwards restarts at the first element.
# Input events
These are the possible input events for Sequential Input:
- Next element: moves the focus to the next element. If focus is currently on the last element, the first element will be focused.
- Previous Element (optional): moves the focus to the previous element. If focus is currently on the first element, the last element will be focused.
- Select element: selects the element that is currently focused
The desired keys for each input event can be selected by clicking first on Record key and consecutively clicking on the desired key.
# Advanced Settings
These are the Advanced settings for Sequential Input:
- Read out active element: if checked the label of the currently focused element is read out on each change of focus