# ARE Development Manual
The AsTeRICS source code repository is hosted at github and located at
https://github.com/asterics/AsTeRICS (opens new window)
The source code contains open source software modules in JAVA, C++ and C, and proprietary modules by AsTeRICS partners which are available in binary from (.dll or .exe).
The licenses of the utilized software packages and 3rd party products can be viewed in the file /documentation/licenses.doc
Currently, the editor for OSKA (the on-screen keyboard application) is the only commercial software package within the AsTeRICS framework – and not included in the free downloads. The OSKA editor is only needed if you want to design custom on-screen keyboard layouts for OSKA (see AsTeRICS User Manual).
# Understanding the component build-scripts
A typical ANT build script for an ARE component looks like the following:
<project name="asterics.${component.id}" default="jar" basedir=".">
    <property name="component.id" value="processor.MyComponent"/>
    <!-- set global properties for this build -->
    <property name="build" location="../out/production/${component.id}"/>
    <property name="src.java" location="src/main/java"/>
    <property name="dist" location=".."/>
    <property name="runtime" location="../../../examples/ARE"/>
    <property name="osgi" location="../../osgi"/>
    <property name="middleware" location="../../middleware"/>
    <property name="services" location="../../services"/>
    <property name="classpath" location=".."/>
       <path id="asterics.classpath">
        <pathelement location="bin"/>
        <pathelement location=
                "${osgi}/org.eclipse.osgi_3.6.0.v20100517.jar"/>
        <pathelement location="${middleware}/asterics.ARE.jar"/>
     </path>
    <property name="resources" location="src/main/resources"/>
  <target name="init">
    <!-- Create the time stamp -->
    <tstamp/>
    <!-- Create the build directory structure used by compile -->
    <mkdir dir="${build}"/>
  </target>
  <target name="compile" depends="init" description="compile the source ">
    <javac srcdir="${src.java}" destdir="${build}" verbose="true" debug="${debug}"
           classpath="${classpath}"> <classpath refid="asterics.classpath"/>
     </javac>
  </target>


  <target name="jar" depends="compile"
          description="generate the OSGi bundle" >
    <jar jarfile="${dist}/asterics.${component.id}.jar" basedir="${build}"
         manifest="${resources}/META-INF/MANIFEST.MF">
        <fileset dir="${resources}"/>
    </jar>
    <copy file="${dist}/asterics.${component.id}.jar"
          tofile="${runtime}/asterics.${component.id}.jar"/>
  </target>
</project>
In the first section of the build script, folder locations for the build intermediates, the final build products (.jar file) and the classpath are defined. The classpath usually points to the “bin” folder, the middleware “asterics.ARE.jar” and the osgi distribution. If a component needs additional resources, their location has to be defined here.
Subsequently the build script defines two build targets: the compilation of the Java source code and the creation of the .jar file. If the .jar file shall contain additional .dlls with native code, they have to be specified in the Manifest file as shows in section 5.14.1.
After the .jar file has been created in the distribution folder, it is copied to the runtime folder (/bin/ARE).
# Starting the ARE middleware and component deployments
To test the ARE and component bundles, open the folder “/bin/ARE”, and use ARE.exe, start.bat or start_debug.bat.
# Structure of the runtime folder “./bin/ARE”:
This folder contains dependencies for running the ARE middleware and the .jars resulting from ANT builds, it has the following structure:
/
+- bin/
   +- ARE/
     +- data/                                 folder for plugin working data
     +- models/                               stored models (configurations)
     +- profile/
        +- config.ini                         system bundles to be started
        +- services.ini                       general service bundles to be started
        +- services-windows.ini               windows-specific service bundles
        +- services-linux.ini                 linux-specific service bundles
        +- services-macosx.ini                macosx-specific service bundles
        +- org.eclipse.osgi/                  osgi bundle cache folder
        +- 1238790741.log                     system log messages, stack trace
    +- tools/                                 plugin helper apps and dlls
    +- .logger                                stores console logging settings
    +- ARE.exe                                starts the ARE without console output
    +- areProperties                          stores recent window/GUI properties
    +- <my_component.jar>                     component bundle(s)
    +- asterics.ARE.jar                       ARE middleware
    +- asterics.mw.services.cimcommunication.jar  CIM port manager
    +- grizzly-httpservice-bundle-2.3.23.jar  http service for webservice feature
    +- javacv-*-linux|windows|macosx.jar      platform specific javacv service
    +- tmp/*.log                              application log files
    +- jtester.exe                            helper app for checking Java version
    +- logging.properties                     configuration of loglevel etc.
    +- org.eclipse.osgi.*.jar                 osgi distribution
    +- sleeper.exe                            helper app for launcher timing
    +- start.bat                              starts ARE with console output
    +- findjava.bat                              searches for the newest 32bit JRE
    +- start_debug.bat                        starts ARE with Eclipse debug support
    +- start.sh                               starts ARE without console on Linux
    +- start_debug.sh                         starts ARE with debugging on Linux
    +- VCChecker.jar                   helper jar for checking VC redist dependency
TIP
Important Note: The osgi configuration folder “org.eclipse.osgi” in the “profile” subdirectory has to be deleted if .dlls in .jar bundles are updated or changed. (This folder is automatically created when starting the ARE and holds working data for the OSGI-bundles.) The One-Click build.xml script described in chapter 2.4.2 deletes the folder automatically.
# AsteRICS services
An AsteRICS service is a bundle that provides ARE-wide functionality usable by other services or plugins. The service can be optionally disabled which means that the service bundle is not installed and not activated. The file services.ini contains a list of general services to be loaded. Whereas the services-windows.ini, services-linux.ini and services-macosx.ini files contain platform dependent service names. You can also create your own use-case specific services ini file and edit the start script to load it.
# Running a deployment
The “ARE.exe” starter application launches the ARE without console output and without debugging instrumentation.
Alternatively, the commandline batch script “start_debug.bat” which is provided in the folder “.bin/ARE” runs Java with additional configuration parameters including:
the location of the OSGi distribution
the profile subfolder which contains the config.ini file: “./bin/ARE/profile”
debugging instrumentation for the remote debugging server connection
After starting the ARE middleware, bundles are loaded and started on-demand if they are needed for the deployment of a model. If everything is properly configured, the ARE window comes up with a GUI and provides ASAPI server functionalities for connection of the ACS or other client applications.
# ARE webserver (including REST API, websocket)
The ARE contains a service that creates several web-based services. These include
a webserver with document root ARE/web and URL: http://localhost:8081/ (opens new window)
a websocket at URL http://localhost:8082/ws/astericsData (opens new window)
a REST API at URL http://localhost:8081/rest (opens new window)
a javascript REST API client implementation example at http://localhost:8081/ (opens new window)
# Define autostart model per command line
By starting the ARE with the name of a model as first command line parameter a model that should be started automatically can be defined. The model must exist in the sub-folder “models”.
‘ARE.exe CameraMouse.acs’
or
‘start_debug.bat CameraMouse.acs’
# Change model task submit timeout
The file “areProperties” contains properties to configure ARE features and to configure the internal model execution behaviour. The following internal model execution properties exist:
ThreadPoolTasks.submitTimeout=20000
- When submitting a task to be executed in the ModelExecutor thread a submit timeout can be configured. After the time elapsed a TimeoutException is thrown. The timeout value must be specified in milliseconds.
The submit timeout is used for starting, stopping, pausing and resuming a model.
- When submitting a task to be executed in the ModelExecutor thread a submit timeout can be configured. After the time elapsed a TimeoutException is thrown. The timeout value must be specified in milliseconds.
# Debugging the ARE
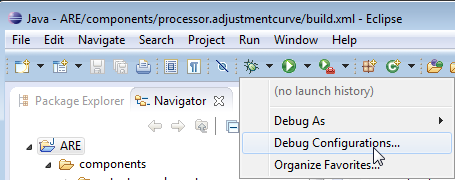
If the ARE is started using the “start_debug.bat” script and source-level debug information was added during the compilation (see section 2.3), debugging with Eclipse is supported via a remote debugging connection. This is a convenient way for dimagesebugging an OSGI-based java framework with a lot of plugins. To enable the debugging support in Eclipse, a Debug Configuration is created via the dedicated menu entry:
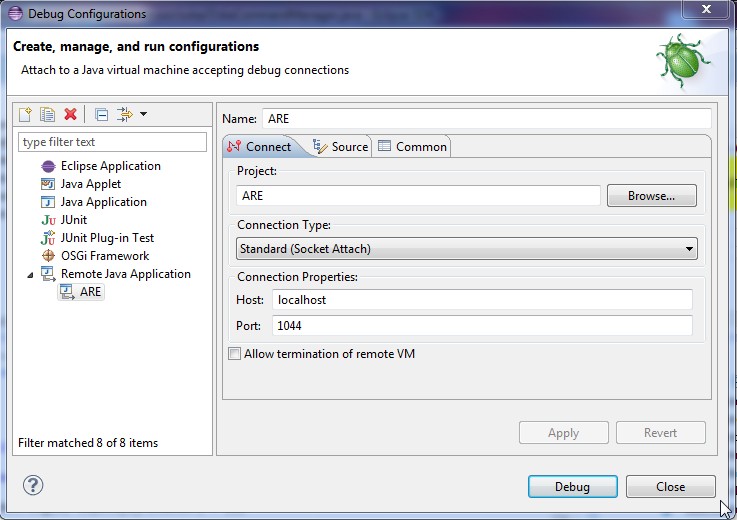
Create a “Remote Java Application” Debug Configuration and assign a name for it, e.g. “ARE”. Then, specify the connection properties of the Debug Configuration to use the Host “localhost” and the Socket/Port “1044” (this port is given in the ARE build scripts for the remote debug server to listen for incoming client connections):
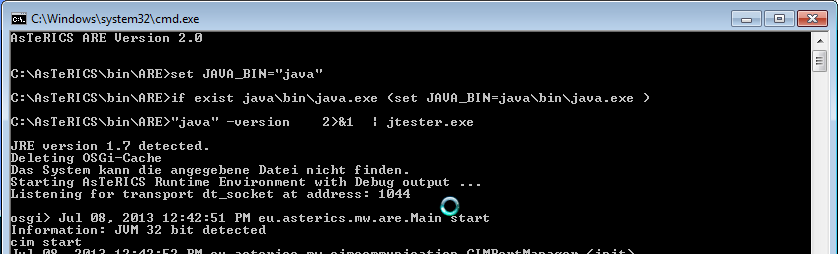
Now launch the ARE using “start_debug.bat”. The messages in the console window should indicate the establishment of the listening socket 1044 for the debugging connection:
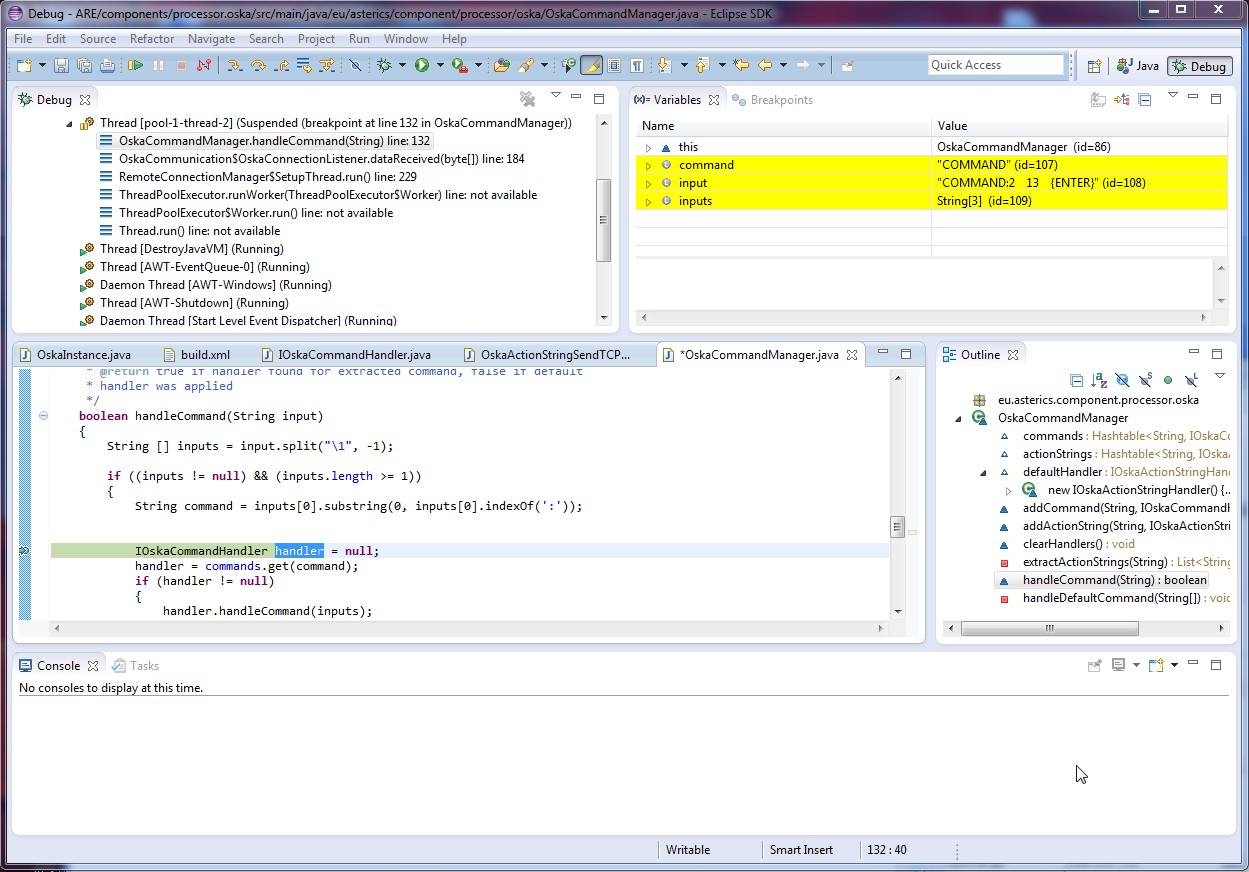
Now, the usual debugging support of Eclipse can be used, including breakpoints in middleware or components, variable and context watch windows, single stepping etc. All these operations are performed in the Eclipse “Debug” perspective.
The following screenshot shows a program execution of the ARE which ran into a breakpoint (here: the OSKA plugin was halted as a command was selected in the OSKA-application and transferred to the ARE plugin’s command handler:
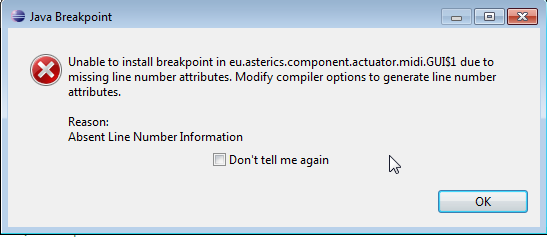
If the source-level debug information is missing (due to compilation without debugging support) an error message indicates a problem, e.g. the missing line number for breakpoint installation:
# Services and Utils: Infrastructure for plugins
The ARE Services are a set of classes that enable the direct interaction between AsTeRICS plugins and other software to directly interact with the runtime environment. The most significant ARE Services are:
CIM Communication Service: the ARE CIM Communication service layer is a unified approach to allow plugins of the ARE to communicate with their associated hardware modules attached to the AsTeRICS platform via a COM port. A range of hardware modules are provided which implement the dedicated Communication Interface Module (CIM) protocol. Further details on this communication protocol and implementation details for the ARE CIM Communication Service can be found in chapter 5.15.
Remote Connection Service: the remote connection services allows external software that cannot be integrated into the standard plugin inter communication system used by the ARE, for example because of programming language incompatibilities, to work with the AsTeRICS system. For example, the interconnection of OSKA (the On-Screen Keyboard Application developed by AsTeRICS partner SENSORY) and the ARE uses the Remote Connection Service to send key selection information to the ARE. On the other hand, the ARE can reply with cell selection commands or other information. The actual communication is done via a protocol that can be understood by the Java ServerSocket implementation. The port number that the external software component connects to identifies the connecting component.
Local Storage Service: The Local Storage Service will allow plugins to store individual working data “per model” and “per plugin-instance”. This is necessary when plugins need to store own calibration data, pattern recognition samples or similar data. In course of the architectural refinements for the final prototype, a service class will be provided which generates an according folder and respective file read- and write methods.
Native Hook Services for systemwide keyboard and mouse capturing
Computer Vision services to support a unified way for frame grabbing, computer vision processing and video frame rendering.
Logging service
ConversionUtils: Helper class to convert port data streams into Java data types and vice versa.
Class ResourceRegistry to fetch resource URIs. If a plugin needs access to a config, data or a multimedia file, the class ResourceRegistry must be used.
# Communicating with peripherals: CIM Communication service
Communication between actuator and sensor components in the ARE and peripheral devices is currently defined to use a serial communication i.e. a COM port or a virtual COM port. Messaging via this interface can either adhere to the CIM protocol (see section 5.15) or use any other protocol using the raw port implementation of the CIM communication services.
All the communication with peripheral devices is done through a service in the ARE service layer called CIM Communication. The service is provided as a separate OSGi bundle which places its classes in the package $1. Access to the classes is done by exporting the entire package in the bundle.
Four classes of the CIM Communication service are important to the component programmer:
CIMPortManager
CIMController
CIMProtocolPacket
CIMEventHandler
# CIMPortController
CIMPortController is an abstract class which hides the actual implementation of the port controller. The port controller provides the same methods for sending packets using the CIM protocol, for raw port implementations and for future uses such as a port controller handling Zigbee connections.
# CIMPortManager
All CIM ports and other COM ports are access through the main class of the package CIMPortManager. This is implemented as a singleton with a public access method getInstance(). Thus all calls to the CIM communication service have to be done through:
CIMPortManager.getInstance()
Upon creation the CIMPortManager detects all the connected CIMs and registers them in a HashMap. CIMs are identified and stored by the combination of their CIM Id and their unique number. Therefore multiple CIMs of the same CIM Id can be used on the AsTeRICS platform.
On some computers there exist certain serial ports which do not work correctly and behave strangely. An example of such a port is a loopback port which echoes everything written to it or ports created by Bluetooth dongles. Since the CIMPortManager iterates through all serial ports, these ports can cause problems in the auto detection of attached CIMs and even lock up the runtime. Therefore a file ignore_ports.txt in the directory data/cimcommunication is parsed upon start of the auto detection. This file should be filled with the name of the COM ports behaving erratically one name per line.
To be able to communicate with a CIM, the CIM port manager provides several methods:
public CIMPortController getConnection(short cimId)
public CIMPortController getConnection(short cimId, long uniqueNumber)
These methods return a CIMPortController (read on for details) instance of the requested CIM. The method using two parameters will return the instance to the port controller which works with the CIM of the exact CIM ID and unique number. If the CIM cannot be found, null will be returned.
Requesting a connection without naming a unique number will return the first port controller connected to a CIM of the correct ID found in the HashMap holding all the port controllers.
Sending data to the connected peripheral can be done in several ways using the following methods of CIMPortManager:
public int sendPacket(short cimId, byte [] data,
	short featureAddress, short requestCode, boolean crc)

public int sendPacket(CIMUniqueIdentifier cuid, byte [] data,
	short featureAddress, short requestCode, boolean crc)

public int sendPacket(CIMPortController ctrl, byte [] data,
	short featureAddress, short requestCode, boolean crc)
Basically these three methods do the same thing, however they do it at different speeds as the first two methods will look up the port controller that the packet should be sent to. Again the method taking only the CIM ID as a parameter will look up the first correct port controller. The third method which is passed the CIMPortController instance returned on getConnection() is the fastest method and should be used whenever possible.
Sending a CIM packet is done by providing the feature address and request code for a certain packet. The feature addresses and request codes can be found in the CIM protocol specification and the basic addresses and requests are also provided as static fields in the CIMProtocolPacket class. If data has to be attached to a CIM protocol packet a byte array holding said data has to be passed to the method, otherwise the data parameter of the method has to be set to null. The caller can also decide whether a CRC checksum should be added to the packet although this is currently unimplemented.
# CIMEventHandler
Receiving a packet is done through use of the CIMEventHandler interface. This interface should be implemented by plugins that wish to communicate with CIMs (or raw ports). The interface contains two methods:
	public void handlePacketReceived(CIMEvent e);
	public void handlePacketError(CIMEvent e);
These methods are called upon correct reception of a packet or upon discovery of an error (timeout of a reply, packet transmission errors, incorrect order of incoming packets …) respectively by the port controller.
Upon correct reception of a CIM protocol based packet the method handlePacketReceived() is called with an instance of CIMEventPacketReceived as parameter. After conversion of the CIMEvent to this class, the packet can be extracted from the event and processed further.
All detected errors lead to a call of handlePacketError() with an appropriate CIMEvent implementation. The possible implemenations are:
CIMEventErrorPacketFault: holds information to error in packet and the broken packet itself
CIMEventErrorPacketLost: holds information on serial number of lost packet
To register the event handler with a specific CIM port controller, the CIMPortController class exposes the following methods:
addEventHandler(CIMEventHandler hdlr)
removeEventHandler(CIMEventHandler hdlr)
A port controller can handle multiple attached event handlers and remove each one separately.
# CIMProtocolPacket
This class holds all the information given in a packet transferred to or from a CIM. There are two ways the developer has to use this class. Upon sending packets the sending component has to set the feature address and the request code. The CIMProtocolPacket class provides the constants as static field to facilitate setting commands.
public final static byte COMMAND_REQUEST_FEATURE_LIST    = 0x00;
public final static byte COMMAND_REPLY_FEATURE_LIST      = 0x01;
public final static byte COMMAND_REQUEST_WRITE_FEATURE   = 0x10;
public final static byte COMMAND_REPLY_WRITE_FEATURE     = 0x10;
public final static byte COMMAND_REQUEST_READ_FEATURE    = 0x11;
public final static byte COMMAND_REPLY_READ_FEATURE      = 0x11;

public final static byte COMMAND_EVENT_REPLY 			 = 0x20;

public final static byte COMMAND_REQUEST_RESET_CIM       = (byte) 0x80;
public final static byte COMMAND_REPLY_RESET_CIM         = (byte) 0x80;
public final static byte COMMAND_REQUEST_START_CIM       = (byte) 0x81;
public final static byte COMMAND_REPLY_START_CIM         = (byte) 0x81;
public final static byte COMMAND_REQUEST_STOP_CIM        = (byte) 0x82;
public final static byte COMMAND_REPLY_STOP_CIM          = (byte) 0x82;
Furthermore the class contains constants for the global features that every CIM has to provide.
public static final short FEATURE_UNIQUE_SERIAL_NUMBER = 0;
Upon reception of an incoming packet the component associated with the CIM sending the packet is notified and a reference to the packet is passed as an instance of CIMProtocolPacket wrapped in a CIMEvent instance. The developer can access all the fields of the packet via the getter methods the class provides:
public short getAreCimID()
public byte getSerialNumber()
public short getFeatureAddress()
public short getRequestReplyCode()
public byte[] getData()
public int getCrc()
# Serial ports not adhering to CIM Protocol (Raw Ports)
Some peripherals use a proprietary protocol to transfer their data. If this is the case the user can open a raw port through the CIMPortManager method:
public CIMPortController getRawConnection(String portName, int baudRate)
This will open the port with the name specified in the parameter portName and set the communication to the specified Baud rate.
Data can be sent to peripheral using the sendPacket() method for the returned CIMPortController. The packet will simply transfer the byte array passed in the data parameter and ignore the values giving the in the other parameter fields.
Received data will be forwarded to the event handler through calls to handlePacketReceived() with a CIMEventRawPacket as parameter. This class holds a public member variable b which holds the value of the received byte. The event handler has to handle the reconstruction of the proprietary packet itself.
HighSpeed Raw Ports:
public CIMPortController getRawConnection(String portName, int baudRate, boolean highSpeed)
A second variant opf the getRawConnection method allows specification of a “highSpeed” parameter. If highSpeed is true, the CIMPortController does not apply any connection handling or callbacks for received data to avoid performance problems in higher bandwidth streaming use cases. In this case, the CIMPortController can return the JAVA InputStream for the openend COM port connection and the plug developer can use it as desired:
portController = CIMPortManager.getInstance().getRawConnection(”COM12”,115200,true);
in = portController.getInputStream();
if (in.available() > 100) myHandlePacket ((byte) in.read());
# Communication through a socket interface: Remote Connection Manager
When using third party software that runs on the same platform (as for example the prominently used On Screen Keyboard Application OSKA), it becomes necessary to establish a communication between ARE and the third party application. This is managed by the RemoteConnectionManager found in the package eu.asterics.mw.services. The main interface to this manager are the classes RemoteConnectionManager and IRemoteConnectionListener.
# IRemoteConnectionListener
This interface is implemented by plugins that need to communicate via a socket communication. The interface contains the following methods:
	void connectionEstablished();
	void dataReceived(byte [] data);
	void connectionLost();
	void connectionClosed();
connectionEstablished() is called whenever a plugin requests a connection and the connection has been established. This can either happen if a connection has already been established before or if the new connection has finished its setup and connection process.
dataReceived() is called whenever new data arrives from the other end of the connection. Data is transferred in a byte array and has to be processed by the event listener.
connectionLost() is called when the connection management cannot read from or write to the socket.
connectionClosed() is called after the connection has been closed.
# RemoteConnectionManager
The RemoteConnectionManager is implemented as a singleton and can be accessed via a public static member of the class. Thus access is always achieved through:
RemoteConnectionManager.instance
A connection is opened by calling the RemoteConnectionManager’s method:
boolean requestConnection (String port, IRemoteConnectionListener l)
This call will try to access a connection on the specified port. Although the port is actually an integer it is passed as a String here. The method will return true if a connection on this port has already been established and attach the remote connection listener passed in the second argument to the connection. If there is no active connection on the specified port, the requestConnection method will initiate the setup of the connection and return false. With this return value the user can decide whether he needs to perform setup actions or will be able to do this in the connectionEstablished() callback.
The socket connection handling is implemented using two threads, one for sending, one for receiving data. The receiver thread will continuously read data from the socket and forward it to the registered listener calling the dataReceived() method. Since incoming data is handled in another thread than the plugin which will use the socket connection, access to the methods handling this data or the way of passing data should be done in a synchronised code block.
Sending data is done calling the method sendData of RemoteConnectionManager:
public boolean writeData(String port, byte[] data)
This method is called using a String holding the port number of the connection socket and an array of bytes to be sent. The call to this method will place the data in an outgoing queue and return true if this was successful. Thus it is not guaranteed that the data has already been sent when the method returns. The sender thread will grab data from the outgoing queue and transfer it via the socket or call the connectionLost() method of the registered listener if there are problems while sending.
Once the connection to a socket is not needed anymore, the user has to close the connection, calling the following method of RemoteConnectionManager:
public void closeConnection(String port)
This will close the socket connection, end all threads and return.
# Local Storage Service
If a model needs to save its own calibration data, training data or other private data that can be different in every model and every instance, the local storage service provides a method to save different data to the same file name on a per plugin instance per model basis.
The service uses a directory tree structure that is placed in the directory the OSGi is run from. Data is saved in a directory called “storage”. In this directory, directories for every model name of a model that uses at least one plugin that accesses local storage can be found. In the third directory layer, directories with the plugin instance name of every plugin that accesses local storage can be found. Thus if a model named “timertest” uses a plugin instance named “timer1” that saves local data this data can be found at the path location “storage/timertest/timer1”.
The service practically consists of only one method:
public File getLocalStorageFile(IRuntimeComponentInstance component, String fileName)
Calling this method located in the AREServices class will return a File object pointing to the requested file name or null if the file could not be opened or the model name could not be retrieved. After opening the file the standard JAVA ways to manipulate files apply.
# Keyboard/Mouse Native Hook Services
The AsTeRICS service jnativehook (if enabled) provides access to the library https://github.com/kwhat/jnativehook (opens new window).
Additionally, the service contains the singleton NativeHookServices that initializes the library to be usable in plugins. A plugin that wants to be a keaboard/mouse listener only has to add the listener to the GlobalScreen instance of the library.
# Computer Vision Services
The AsTeRICS services javacv and computervision (if enabled) provide access to the library https://github.com/bytedeco/javacv (opens new window), which again provides access to numerous libs in the field of computer vision (e.g. OpenCV), frame grabbing and frame rendering. Additionally, some helper classes are provided for face detection.
# Data Conversion Utilities
The middleware provides the class “ConversionUtils” that provide static helper methods to convert model data types to byte arrays and vice versa. The conversion is needed to convert incoming data of input ports or outgoing data to output ports. There are methods for each type of conversion. If two connected ports (output to input) have different data types the data is automatically converted to the data type of the input port.
Check the class ConversionUtils for a full list of supported methods: https://github.com/asterics/AsTeRICS/blob/master/ARE/middleware/src/main/java/eu/asterics/mw/data/ConversionUtils.java (opens new window)
# Fetching resource URIs with ResourceRegistry class
If a plugin needs resources like data files (images, keyboard files, haarcascade definitions,…), the class ResourceRegistry (opens new window) must be used to fetch the resource URI.
This can be done by using the method:
public URI getResource(String resourcePath, RES_TYPE type) throws URISyntaxException
Returns the URI according to the given resourcePath string and the given resource type RES_TYPE.
Please refer to the Javadoc of the class and to the wiki page (opens new window) for further examples.
# Error Reporting (AstericsErrorHandling)
The AstericsErrorHandling provides a unified logging and error reporting mechanism. It contains methods for reporting an error of a component or even the ARE.
# Logging
The Logging support provides a uniform way of error reporting in the runtime environment so we have utilized the Java logging libraries and the various severity levels supported. The AsTeRICS error handling mechanism is used extensively from the runtime core classes but also utilized by the AsTeRICS components via the AstericsErrorHandling interface.
Each component is allowed to report an error message, a debug information or a simple information to be displayed on the screen. The ARE maintains four separate log files and updates them whenever a new error occurs. In particular there are different loggers for reporting severe errors, warnings, fine errors and one logger that contains them all.
ARE also maintains a status object for the current status of the runtime environment. Whenever a fatal error occurs (either internally or caused by one of the deployed components) the status changes to fatal error. Other possible statuses are unknown, OK, deployed, running and paused.
The ACS can request the current status of the runtime environment and update its own state accordingly. For example the ACS user can be informed about the current ARE status while the ACS will terminate a connection (or refuse to establish a new one) with a non-working ARE.
Using a Logger is the recommended way to report notifications or error descriptions to the user. In the ARE framework, using the Java logging service is recommended. The Java logger can be configured using the file “logging.properties” (see section 2.3.3.1) and used as follows:
import java.util.logging.Logger;
(…)
private static Logger logger = AstericsErrorHandling.instance.getLogger();
# Error Reporting of components
If a component wants to notify an error it should use the following method:
public void reportError(IRuntimeComponentInstance component, String errorMsg)
The messages will be written in the “asterics_logger_warning.log” file. Additionally the status of the component is set to error with the given error message and an error dialog is shown in the ARE gui, if enabled.
public void reportInfo(IRuntimeComponentInstance component, String info)
The messages will be written in the “asterics_logger_fine.log” file.
# Status checking
The status checking mechanism is responsible for recording the current status of the ARE or the error state of a component. The status is recorded by creating and storing objects called statusObjects. A statusObject stores the status of its creator as a string, its creator (the ARE or the specific component) and the error message.
public static void setStatusObject(String status, String componentID,
String errorMsg)
The status of the ARE can be one of the following strings:
UNKNOWN: initial state for the ARE
OK: ARE is running and ready to deploy a model
DEPLOYED: A model has been deployed and the ARE is now ready to run the model
RUNNING: A model is running on the ARE
PAUSED: A model has been deployed and the ARE is in paused mode
ERROR: An error occurred
FATAL_ERROR: A fatal error occurred, model or deployment aborted
The status of a component can only be the ERROR state because this is the only state of a component that we are interested in recording for later use. An ERROR statusObject is automatically created when a component calls the reportError method as described above.
For retrieving the statusObjects, the following method is used:
public StatusObject[] queryStatus(boolean fullList)
This method is particularly useful for the ACS to determine the current status of the runtime environment and of the deployed components. If the ARE or one of the components are in a problematic state it can be reflected in the ACS.
The boolean fullList argument specifies whether the error list to be returned will include all statusObjects generated since the ARE startup or just those that have not been requested by the ACS before.
# The ARE Thread Pool
In order to avoid resource greedy threads and to achieve best thread handling, ARE uses one of the Thread Pool implementations provided by Java since JRE 1.5. In particular, we have utilized the java.util.concurrent.Executors library for creating a CachedThreadPool.
A cached thread pool will create threads as needed but will reuse previously instantiated threads when they are available and inactive. A cached thread pool is particularly useful for many short-lived asynchronous tasks and improves the performance of the runtime environment.
Developers are expected to use the ARE thread pool for executing their tasks that require a new Thread. You will need to import the middleware services package in order to get access to the AstericsThreadPool class.
# The ARE GUI support
The ARE provides a panel area (“ARE Desktop”) where plugins can display their graphical elements using the ARE GUI support classes. The ACS provides a dedicated canvas editor that allows end users positioning and resizing graphical elements of the plugins. Based on this information, the ARE displays plugins on the local device, maintaining the correct screen position and aspect ratio of graphical elements with respect to the screen resolution of the deployment device. (For more information about the usage of the ACS GUI editor and the ARE GUI control panel refer to the User Manual.)
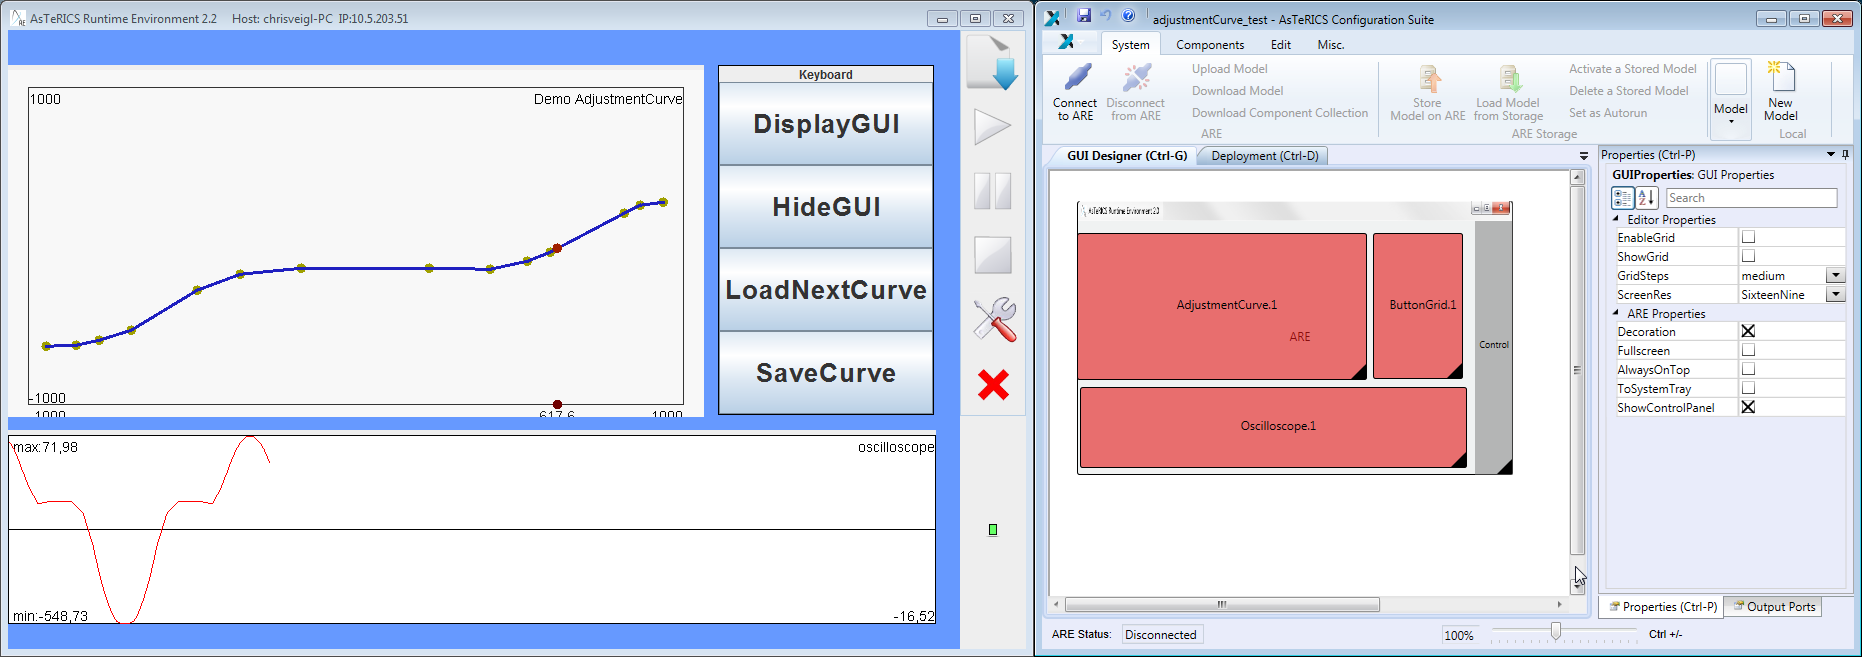
GUI composition using the ACS GUI designer (right), resulting ARE GUI (left)
In order to be recognized as GUI-plugin by ACS and ARE, the bundle descriptor of the plugin has to be extended with a dedicated <gui> entry, which specifies the default size in a virtual coordinate system of 10000/10000 pixels. In the deployment model, the ACS will create position and size information according to the area defined in the ACS GUI designer.
 <gui>
    <width>5000</width>
    <height>3000</height>
 </gui>
The gui element addition to the bundle descriptor
The AsTeRICS middleware provides some services to the plugin developers in order to allow them displaying their GUI element onto the ARE Desktop. The middleware services encapsulate the complexity of dealing with positioning and allow displaying all GUI elements onto the same container: the ARE Desktop.
All GUI services are defined in eu.asterics.mw.services.AREServices so developers need to import this class in order to get access to the following methods:
- void displayPanel (JPanel panel, IRuntimeComponentInstance componentInstance, boolean display)
This method is used for displaying (or hiding) a plugin’s panel at/from the ARE desktop. Developers need to pass
the panel they want to be displayed (or removed)
the plugin object, in order to help the middleware finding the desired position and dimensions from the deployment model
a boolean argument specifying if they wish to hide or show the given panel.
Dimension getAvailableSpace(IRuntimeComponentInstance componentInstance)
The space that each plugin will occupy on the ARE desktop is defined by the designer on the ACS and passed to the ARE via ASAPI. Plugin developers can get the available space for their graphical elements by calling the getAvailableSpace method which will return the space occupied for the plugin object passed as argument.
- Point getComponentPosition (IRuntimeComponentInstance componentInstance)
The positioning of plugin’s GUI elements is defined by the designer on the ACS and passed to the ARE via ASAPI. Plugin developers can get the position of their graphical elements by calling the getComponentPosition which will return the position on screen for the plugin object passed as argument.
- void adjustFonts(JPanel panel, int maxFontSize, int minFontSize, int offset)
This service can be used by plugin developers interested in auto-adjusting the fonts of their GUI components depending on the space occupied for their plugins on the ARE desktop. They need to pass
a panel to which all the internal fonts will be auto-adjusted
the maximum font size (in case there is more space available than needed)
the minimum font size, in case there is too little space which causes the text to become non-readable. Finally, the offset argument is used in case we want to occupy a percentage of the available space.
A good approach to GUI plugin development is to analyse existing plugins which provide GUI elements, e.g. the BarDisplay or Oscilloscope actuators, or the Slider or Cellboard sensor components.
If the plugin uses Swing to implement a GUI-widget (e.g. Slider,…), please check the following guidelines as well 4.2.8
# ARE core events notification services
The ARE core events notification service allows plugins to register/unregister to the ARE middleware in order to receive notifications of ARE core events.
- void registerAREEventListener(IAREEventListener clazz)
It is sometimes necessary that plugins can be notified of various ARE events so they can react as needed. This method can be called by component instances that wish to be notified of such ARE events. Currently, the core events supported are:
preDeployModel: registered ARE event listeners will be notified just before the deployment of a model.
postDeployModel: registered ARE event listeners will be notified immediately after the deployment of a model.
preStartModel: registered ARE event listeners will be notified just before the currently deployed model is started.
postStartModel: registered ARE event listeners will be notified immediately after the currently deployed model has been started.
preStopModel: registered ARE event listeners will be notified just before the currently deployed model is stopped.
postStopModel: registered ARE event listeners will be notified immediately after the deployed model has been stopped.
prePauseModel: registered ARE event listeners will be notified just before the currently deployed model is paused.
postPauseModel: registered ARE event listeners will be notified immediately after the deployed model has been paused.
preResumeModel: registered ARE event listeners will be notified just before the currently deployed model is resumed.
postResumeModel: registered ARE event listeners will be notified immediately after the deployed model has been resumed.
preBundlesInstalled: registered ARE event listeners will be notified just before the bundles are is installed.
postBundlesInstalled: registered ARE event listeners will be notified immediately after the bundles have been installed.
void unregisterAREEventListener(IAREEventListener clazz)
Plugins already registered for receiving ARE core events can un-register using this method.
# Dynamic Properties
In some applications, the ACS should be able to provide several options for property values which are not known in advance but depend on the current state of the ARE (see AsTeRUCS User Manual, section “Dynamic Properties”)… A typical example is the selection of a file which is available in the ARE file system (e.g. a .wav-file for the wave player plugin). This feature is particularly useful for plugins that are hardware dependent (selecting e.g. a soundcard or a midi player), or depend on the file system.
If a plugin is implementing a dynamic property, the values will be requested from the ARE, as soon as the ACS is synchronized with the ARE, via the ASAPI function:
List<String> getRuntimePropertyList(String componentID, String key).
The ARE middleware will forward the request for valid property values to the component instance with the given ID. The List<String> getRuntimePropertyList(String key) method has to be implemented in the AbstractRuntimeComponentInstance class which every AsTeRICS component extends.
The method implementation creates the list of valid properties and returns it to the middleware and the latter forwards the string list to the ACS via ASAPI. The ACS will dynamically update the property list in the properties window.
For an example of the dynamic property implementation, see the WaveFilePlayer plugin.
# Data Synchronization
Some plugins need data of multiple input ports to be able to start processing. Without data synchronization it is possible that one input port of a plugin receives multiple values before another port gets one value, although both signal channels deliver values at the same sampling rate.
The synchronization service provides a buffering mechanism at the middleware level that can be utilized by plugin developers in order to make sure that incoming data of selected input ports arrives synchronized.
To use the synchronization service in the plugin code, plugin developers are expected to extend the DefaultRuntimeInputPort instead of implementing the IRuntimeInputPort. Basically, DefaultRuntimeInputPort provides a default implementation for the necessary buffering methods, as shown in the table below.
public abstract class DefaultRuntimeInputPort implements IRuntimeInputPort {

	private boolean buffering;
	 public void receiveData(final byte [] data) {
		 ;
	 }
	public void startBuffering (AbstractRuntimeComponentInstance c,
			String portID) {
		this.buffering = true;
	}
	public void stopBuffering (AbstractRuntimeComponentInstance c,
			String portID) {
		this.buffering = false;
	}
	public boolean isBuffered () {return this.buffering;}
}
The designer can define that a plugin’s input port should be synchronized with some other input ports via the ACS. This will cause an argument change of the inputPort element on the deployment model file (e.g.,<inputPort portTypeID="inB" sync="true">).
As soon as a model is deployed on the ARE, the middleware collects per component every port noted as synchronized port. When the model is successfully deployed and started, the ARE will buffer data which enters synchronized input ports until data on all synchronized ports has arrived. At that point, the ARE will call a new AbstractRuntimeComponentInstance callback method.
Developers that wish to support data synchronization need to implement the following method at their component instances.
public void syncedValuesReceived(HashMap<String, byte[]> dataRow)
Where dataRow is a HashMap between Input Port ID and byte[]. For synchronized input ports, instead of implementing the regular void receiveData(byte[] data) method which delivers incoming data of a single port, developers need to implement the syncedValuesReceived method which will be called from the ARE with synchronized data from all the input ports that have been selected.
# Interfacing Native C/C++ Code via JNI
## Specifying native libraries in the Manifest
The Manifest file of a bundle which includes native libraries has to specify these .dlls as shown in the following example:
Manifest-Version: 1.0
Bundle-ManifestVersion: 2
Bundle-Name: asterics-sensors.mycomponent
Bundle-SymbolicName: org.asterics.mycomponent
Bundle-Version: 0.1.0
Bundle-NativeCode: lib/native/mylib1.dll;
 lib/native/mylib2.dll;
 lib/native/mylib3.dll;
 osname=win32;processor=x86;
 osname=win;processor=x86-64;
 osname=win8;processor=x86;
 osname=win8;processor=x86-64;
 osname=windows 8;processor=x86;
 osname=windows 8;processor=x86-64;
 osname=windows8;processor=x86;
 osname=windows8;processor=x86-64;
 osname=Windows 8.1;processor=x86;
 osname=Windows 8.1;processor=x86-64
DynamicImport-Package: *
Components which interface native code via JNI and their respective manifest files can be found in the SVN, e.g. the “webcamera” component or the signal processing plugins by Starlab.
Note that the .jar containing the .dlls can be built manually using the command:
jar -cvfm ../mybundle.jar META-INF/MANIFEST.MF .
# Java-Implementation: JNI-Bridge
The recommended way to interface Java code of an ARE component with native code in a .dll is a bridge class which encapsulates the JNI functions and callbacks and maps the functions of the ARE component’s lifecycle-, port- and property-management to the corresponding functions in the native code. Here is a simple example which comprises one component property and receives data callbacks from a thread implemented in C. The received values are transferred to the component’s output port:
package org.asterics.jni;
import org.asterics.mycomponent.MyComponentInstance;
import java.util.logging.Logger;

public class Bridge
{
    /*      Statically load the native library     */
    static
    {
        System.loadLibrary("mylib1");  // loads mylib1.dll
        System.loadLibrary("mylib2");  // loads mylib2.dll
        System.loadLibrary("mylib3");  // loads mylib3.dll
    }

    private static final Logger logger = Logger.getAnonymousLogger();
    private final MyComponentInstance.OutputPort my_outport;

    public Bridge(final MyComponentInstance.OutputPort my_outport)
    {
        this.my_outport = my_outport;
    }
    /**
     * Activates the underlying native code/hardware.
     *
     * @return 0 if everything was OK, a negative number otherwise
     */
    native public int activate();
    /**
     * Deactivates the underlying native code/hardware.
     *
     * @return 0 if everything was OK, a negative number otherwise
     */
    native public int deactivate();
    /**
     * Gets the value of the named property.
     *
     * @param key the name of the property to be accessed
     * @return the value of the named property
     */
    native public String getProperty(String key);
    /**
     * Sets the named property to the defined value.
     *
     * @param key the name of the property to be accessed
     * @param value the value to be assigned to the named property
     * @return the value previously assigned to the named property
     */
    native public String setProperty(String key, final String value);
    /**
     * This method is called back from the native code on demand to signify
     * an internal error. The first argument corresponds to an error code
     * and the second argument corresponds to a textual description
     * of the error.
     * @param errorCode an error code
     * @param message a textual description of the error
     */
    private void errorReport_callback(
            final int errorCode,
            final String message)
    {
        logger.severe(errorCode + ": " + message);
    }
    /**
     * This method is called back from the native code to send data
     * to the component’s output port.
     *
     * @param data1  (range is [0, Short.MAX_VALUE])
     */
    private void newData_callback(final int data1)
    {
        my_outport.sendData(data1);
    }
}
# C-Implementation: Callbacks and JNI code
The native C-code needs to be compiled into a .dll and include the JNI header files and libraries. An example for the Microsoft Visual Studio compiler looks as follows:
The following C-example shows how to implement a JNI-callback from a C-thread and an ARE-compliant exchange of a component property:
#include <jni.h>

static JavaVM * g_jvm;
static jobject g_obj = NULL;

const char * propertyKey = "myProperty";
const char * propertyValue = "20";

JNIEXPORT jint JNICALL Java_org_asterics_jni_Bridge_activate
  (JNIEnv * env, jobject obj)
{
	jint error_code = 0;
	error_code = env->GetJavaVM(&g_jvm);
	if(error_code != 0)
	{
		return error_code;
	}
	jclass cls = env->GetObjectClass(obj);
	jmethodID mid = env->GetMethodID(cls, "newData_callback", "(IIII)V");
	if (mid == NULL) return -1; /* method not found */
	// explicitly ask for a global reference
	g_obj = env->NewGlobalRef(obj);

      my_c_thread_init();
	return error_code;
}

JNIEXPORT jint JNICALL Java_org_asterics_jni_Bridge_deactivate
   (JNIEnv * env, jobject obj)
{
	jint error_code = 0;
	my_c_thread_exit();
	env->DeleteGlobalRef(g_obj);
	return error_code;
}

JNIEXPORT jstring JNICALL Java_org_asterics_jni_Bridge_getProperty
  (JNIEnv *env, jobject obj, jstring key)
{
	const char *strKey;
	jstring result;

      if (key == NULL) return NULL; /* OutOfMemoryError already thrown*/
      strKey = env->GetStringUTFChars(key, NULL);

      if(strcmp(propertyKey, strKey) == 0)
	{
		result = env->NewStringUTF(propertyValue);
	}
	else
	{
		result = NULL; /* property was not found */
	}
      env->ReleaseStringUTFChars(key, strKey);
      return result;
}

JNIEXPORT jstring JNICALL Java_org_asterics_jni_Bridge_setProperty
  (JNIEnv *env, jobject obj, jstring key, jstring value)
{
	const char *strKey;
	const char *strValue;
	jstring result;

      if (key == NULL) return NULL; /* OutOfMemoryError already thrown*/
	  strKey = env->GetStringUTFChars(key, NULL);

      if (value == NULL) return NULL; /* OutOfMemoryError already thrown */
	  strValue = env->GetStringUTFChars(value, NULL);

      if(strcmp(propertyKey, strKey) == 0)
	{
		result = env->NewStringUTF(propertyValue);
		pollingIntervalValue = strValue;
	}
	else
	{
		result = NULL; 	/* property was not found */
	}

      env->ReleaseStringUTFChars(key, strKey);
      env->ReleaseStringUTFChars(value, strValue);
      return result;
}

 // prepare JNI callback
  JNIEnv *env;
  g_jvm->AttachCurrentThread((void **)&env, NULL);
  jclass cls = env->GetObjectClass(g_obj);
  jmethodID mid = env->GetMethodID(cls, "newCoordinates_callback", "(IIII)V");

// perform JNI callback
  env->CallVoidMethod((jint)my_new_data);
This native C-code needs to be compiled into a .dll, the JNI header files and libraries have to be specified to the compiler and linker respectively. An example for the Microsoft Visual Studio build tools looks as follows:
cl -c -I "C:\Program Files (x86)\java\jdk1.6.0_21\include" -I "C:\Program Files (x86)\java\jdk1.6.0_21\include\win32" -I ".\3rdparylib" my_c_file.cpp /ZI /nologo /W3 /WX- /Od /Oy- /D "WIN32" /D "_DEBUG" /D "_WINDOWS" /D "_CRT_SECURE_NO_WARNINGS" /D "_VC80_UPGRADE=0x0710" /D "_MBCS" /Gm- /EHsc /RTC1 /MTd /GS /fp:precise /Zc:wchar_t /Zc:forScope /Gd /analyze- /errorReport:queue
link my_c_file.obj /DLL /OUT:".\my_c_file.dll" /INCREMENTAL:NO /NOLOGO /LIBPATH:"libmsvc" /LIBPATH:"3rdparylib" "odbc32.lib" "odbccp32.lib" "comctl32.lib" "winmm.lib" "opengl32.lib" "ole32.lib" "strmiids.lib" "uuid.lib" "kernel32.lib" "user32.lib" "gdi32.lib" "winspool.lib" "comdlg32.lib" "advapi32.lib" "shell32.lib" "oleaut32.lib" /NODEFAULTLIB:"libcd.lib" /NODEFAULTLIB:"atlthunk" /NODEFAULTLIB:"LIBCMT"  /MANIFESTUAC:"level='asInvoker' uiAccess='false'" /DEBUG /SUBSYSTEM:WINDOWS /TLBID:1 /DYNAMICBASE:NO /MACHINE:X86 /ERRORREPORT:QUEUE
TIP
The compiler and linker switches may differ depending on the nature of your dependency libraries and setup.
# AsTeRICS Packaging Environment (APE)
The APE let’s you select a set of AsTeRICS model files and create a downstripped (minimum size) version of the ARE including plugins, configuration files and data files to execute the models. Optionally, the APE allows the creation of native installers for Windows, Linux incl. Raspberry Pi and Mac OSX using JavaFX packaging technology (opens new window).