# Websocket Tutorial
In this tutorial you will learn how to use the AsTeRICS websocket functionality with Javascript from within a web client.
# Introduction
A web socket is defined as a two-way communication between the servers and the clients, which mean both the parties communicate and exchange data at the same time. The Websocket protocol is specified in the RFC6455 (opens new window) and the corresponding client-side Websocket API (opens new window) is defined by the W3C. For more information about web sockets see the following tutorials
- Mozilla - web sockets tutorial (opens new window)
- Tutorialspoint - web sockets tutorial (opens new window)
The AsTeRICS Runtime Environment (ARE) provides a websocket at ws://localhost:8082/ws/astericsData which can be used to send data from a running AsTeRICS model to a web client or vice versa.
# Example 1 - Web socket echo
Sends a text message to the ARE model and echoes the sent message back to the web client.
# Prerequisites
# Create model with WebSocket plugin
- Open the WebACS (opens new window)
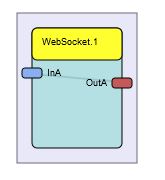
- Add a WebSocket plugin (Components tab, Processors/Web/WebSocket)
- Connect the output port
OutAto its input portInA: This sends messages received from a websocket client back to the client. - Start the ARE (ARE.exe|start.bat|start.sh)
- Deploy model to ARE by clicking
Connect to AREandUpload Model - Start model by clicking
Start Model
# Create web page with web socket client
Using a text editor, copy the following code and save it as websocket.html somewhere on your hard drive. Then simply open it in a browser. The page will automatically connect, send a message, display the response, and close the connection.
<!DOCTYPE html>
<html>
  <head>
    <meta charset="utf-8" />
    <title>WebSocket Test</title>
    <script language="javascript" type="text/javascript">

    //Set URI of AsTERICS websocket.
    var wsUri = "ws://localhost:8082/ws/astericsData";
    var output;

    /*
      This method is called on page load.
    */
    function init()
    {
    output = document.getElementById("output");
    testWebSocket();
    }

    /*
      Opens a connection to the specified web socket and defines callback functions.
    */
    function testWebSocket()
    {
    //Instantiates and opens  web socket.
    websocket = new WebSocket(wsUri);
    websocket.onopen = function(evt) { onOpen(evt) };
    websocket.onclose = function(evt) { onClose(evt) };
    websocket.onmessage = function(evt) { onMessage(evt) };
    websocket.onerror = function(evt) { onError(evt) };
    }

    /*
      Called as soon as the web socket was opened successfully.
    */
    function onOpen(evt)
    {
    writeToScreen("CONNECTED");
    doSend("WebSocket rocks");
    }

    /*
      Called as soon as the web socket was closed.
    */
    function onClose(evt)
    {
    writeToScreen("DISCONNECTED");
    }

    /*
      Called in case of a received message from the web socket server.
    */
    function onMessage(evt)
    {
    writeToScreen('<span style="color: blue;">RESPONSE: ' + evt.data+'</span>');
    websocket.close();
    }

    /*
      Called in case of an error during connect or send.
    */
    function onError(evt)
    {
    writeToScreen('<span style="color: red;">ERROR:</span> ' + evt.data);
    }

    function doSend(message)
    {
    writeToScreen("SENT: " + message);
    //Actually sends the message to the web socket.
    websocket.send(message);
    }

    function writeToScreen(message)
    {
    var pre = document.createElement("p");
    pre.style.wordWrap = "break-word";
    pre.innerHTML = message;
    output.appendChild(pre);
    }

    //Register function init to be called on page load.
    window.addEventListener("load", init, false);

    </script>
  </head>
  <body>
    <h2>WebSocket Test</h2>

    <div id="output"></div>
  </body>
</html>
# Resulting output
In case of success you should see something like this:
WebSocket Test

CONNECTED

SENT: WebSocket rocks

RESPONSE: WebSocket rocks

DISCONNECTED
In case of an error check if the ARE is running and the model with the WebSocket plugin is deployed and started.
# Example 2 - Web socket demo with signal data live chart
To try a more advanced web socket demo receiving signal data and visualizing it, please visit this web socket demo (opens new window) to see how it works. You can also clone and edit the corresponding git repository (opens new window).
# References
← REST 01 Structure →